
Universalband für Metalltüren
Paumelles universelles pour portes en métal
Universal hinges for metal doors


Rahmenbandteil vorbereiten
Préparation du bras dormant
Preparing hinge blade for frame

Lagerbuchse einschieben, Markierungspfeile zeigen in Richtung des Flügels.
Introduire la douille, les flèches étant orientées vers l’ouvrant.
Slide bearing bushing in, the arrow points in the direction of the door.

Hebespindel einschrauben, bis Lagerbuchse in Null-Stellung.
Visser la broche de soulèvement jusqu’à la position zéro de la douille.
Screw-in lifting and lowering
spindle until bearing bushing is in 0 position.
Flügelbandteil vorbereiten
Préparation du bras ouvrant
Preparing hinge blade for door

Kappe aufsetzen.
Poser le capuchon.
Snap on cap.

Lagerbolzen bis zum Anschlag einschieben.
Monter l’axe en l’amenant en butée.
Insert bearing pin until it stops.

Gegenlaufscheibe aufstecken.
Emboiter la rondelle.
Insert upthrust washer.

Lagerbolzen abwechselnd festsetzen.
Bloquer l’axe tour à tour.
Secure bearing pin
alternately.
Montage des Türbands
Montage de la paumelle
Installing the hinge

Wir empfehlen beim Einsatz von Drehflügelantrieben, kräftigen Schließmitteln, Türstoppern oder starker Beanspruchung in einem Abstand von 150 mm unterhalb des oberen Türbandes ein weiteres drittes Band anzuordnen. Wir beraten Sie gerne.
Si vous utilisez un ouvre-porte automatique, un ferme-porte puissant, une butée de porte ou si votre porte est soumise à un grand trafic, nous préconisons le montage d’une troisième paumelle à
150 mm sous la paumelle du haut. Nous vous conseillons volontiers.
With automatic swing door operator, heavy closing devices, doorstops or heavy operational demand, we recommend placing a further 3rd hinge at a distance of 150 mm beneath the top hinge.
Please contact us.

nach innen öffnend
ouverture vers l‘intérieur
inward opening

nach außen öffnend
ouverture vers l’extérieur
outward opening

Bohrlehren Türband 3 können genutzt werden.
Les gabarits de la Türband 3 peuvent être utilisés.
Drilling jig for TB3 can be used.

Schattennut gemäß Einbauzeichnung und Systemvorgabe sichern, Bohrlehre festklemmen.
Définissez la rainure selon le plan d‘implantation et les contraintes
inhérentes aux profils utilisés. Fixez
le gabarit.
Ensure shadow groove acc.to dwg. and specified system, fix drilling jig.

Rahmen und Flügel verspannen.
Fixez le dormant et l’ouvrant.
Brace frame and doorleaf.

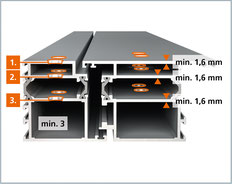
Ø 11 mm bohren – durch mindestens zwei Profilwandungen.
Percer un Ø de 11 mm – au moins à travers deux parois de profil.
Drill 11 mm diameter holes with at least 2 profile fixtures.
Alternative Befestigung: Befestigungsplatte.
Variante de fixation : plaque de fixation.
Alternative mounting: Mounting plate.

Empfehlung für Einbruchhemmung RC2 / RC3
Préconisation pour résistance à l’effraction RC2 / RC3
Recommendation for burglar resistance RC2 / RC3

Zusammengestecktes Rahmen- und Flügelbandteil auf Profil aufsetzen und durch mindestens zwei Profilwandungen von jeweils min. 1,6 mm verschrauben (20 Nm).
Positionnez les parties dormante et ouvrante préalablement assemblées sur le profil et vissez-les à travers au moins deux parois de 1,6 mm d’épaisseur minimum chacune (20 Nm).
Fix joined frame- and doorleaf part onto profile with at least 2 profile fixtures of at least min. 1,6 mm each (20 Nm).

Abdeckstücke aufklippsen, Kappe aufstecken.
Enchâssser les caches vis, placer le capuchon.
Snap on cover strips and snap caps in place.

Abdeckstücke von der Rückseite sichern.
Sécuriser les caches vis par l’arrière.
Secure cover strips on the back side.
Einstellanleitung
Verstellung der Bänder nur durch im Türenbau erfahrene Fachhandwerker.
Notice de réglage
Réglage et montage des paumelles uniquement par des professionnels qualifiés.
Adjustment instructions
Adjustment and regulation only to be done by an experienced tradesman.
Horizontalverstellung
Réglage horizontale
Horizontal adjustment

Abdeckstück muss von der Rückseite gesichert sein.
Le cache-vis doit être
bloqué par derrière.
Covering cap must be secured from the rear side.

Gewindestifte mit einer
1/2-Umdrehung lösen.
Desserrez les vis pointeaux en effectuant un demi-tour.
Loosen set screws by half a turn.

Kappe entfernen. Durch Drehen der Spindel am oberen Bandteil Horizontalverstellung vornehmen (± 2,5 mm). Kappe aufstecken.
Retirez le capuchon. Procédez au réglage horizontal en tournant la vis sans fin au niveau de la paumelle supérieure (± 2,5 mm). Placez le capuchon.
Remove cap. Adjust horizontally by turning the spindle on the upper hinge section (± 2.5 mm). Snap cap in place.

Wichtig: Gewindestifte abwechselnd festziehen.
Important : Serrrez les vis
pointeaux tour à tour.
Important: Tighten the
setscrews alternately.
Höhenverstellung
Réglage en hauteur
Height adjustment


Untere Kappe entfernen. Höhenverstellung + 3 / – 2 mm. Kappe aufsetzen.
Retirez le capuchon inférieur. Réglage de la hauteur + 3 / – 2 mm. Posez le capuchon.
Remove bottom cap. Height adjustment + 3 / – 2 mm. Snap on cap.

Höhenverstellung immer nur am unteren Band vornehmen – obere Bänder nur nachstellen.
Le réglage en hauteur s’effectue uniquement sur la paumelle basse les paumelles hautes sont uniquement réajustées.
Carry out height adjustment only on bottom hinge – Readjust only upper hinges.
Dichtungsandruck verstellen
Régler la pression du joint d’étanchéité
Adjust sealing pressure

Untere Kappe entfernen. Nur am zu verstellenden Band Hebespindel herausschrauben. Bandweise
vorgehen.
Retirez le capuchon inférieur. Dévissez la broche de soulèvement uniquement sur la paumelle à régler. Procéder paumelle par paumelle.
Remove bottom cap. Only screw-out lifting and lowering spindle on the hinge needing adjusting. Proceed in this manner, hinge
by hinge.

Lagerbuchse um ± 90° drehen bis sie spürbar einrastet (Dichtungsandruck ± 0,5 mm).
Tournez la douille de ± 90° jusqu’à l’encliquetage sensible (pression du joint d’étanchéité ± 0,5 mm).
Turn the bearing bushing ± 90° until you feel it catch(sealing pressure ± 0,5 mm).

Hebespindel wieder einschrauben. Kappe aufsetzen.
Revissez la douille filetée. Posez le capuchon.
Screw lifting and lowering spindle back in. Snap on cap.

Markierung am Buchsenkragen zeigt nach der Verstellung nach hinten.
Suite au réglage, l’encoche sur la collerette des douilles filetées hautes et basses des bras dormants est orientée vers l’arrière.
After adjustment, the mark of the collar points to the back.

Nullstellung
Position zéro
zero position

Markierung am Buchsenkragen zeigt nach der Verstellung nach vorne.
Après le réglage, les marquages des rondelles de douille sont orienté vers l’avant.
After adjustment, the mark of the collar points to the front.

Lagerbuchse aus wartungsfreiem teflonhaltigen Kunststoff – keinesfalls schmieren!
Douille en matière plastique à teneur en téflon ne requérant aucun entretien – ne graisser en aucun cas !
Bearing bushes made of maintenance-free PVC containing Teflon – do not lubricate!